Secrets of 3D computer graphics
No matter how large or rich the virtual 3D world, a computer can depict (изображать на картине, рисовать) that world only by putting pixels on the 2-D screen. This section will focus on just how what you see on the screen is made to look realistic, and especially on how scenes are made to look as close as possible to what you see in the real world. First we'll look at how a
single stationary object is made to look realistic. Then we'll answer the same question for an entire scene. Finally, we'll consider what a computer has to do to show full-motion scenes of realistic images moving at realistic speeds.
A number of image parts go into making an object seem real. Among the most important of these are shapes, surface textures, lighting, perspective, depth of field and anti-aliasing.
Shapes
When we look out our windows, we see scenes made up of all sorts of shapes, with straight lines and curves in many sizes and combinations. Similarly, when we look at a 3D graphical image on our computer monitor, we see images made up of a variety of shapes, although most of them are made up of straight lines. We see squares, rectangles, parallelograms, circles and rhomboids, but most of all we see triangles. However, in order to build images that look as though they have the smooth curves often found in nature, some of the shapes must be very small, and a complex image -- say, a human body -- might require thousands of these shapes to be put together into a structure called a wireframe (каркасный (проволочный) метод изображения объекта).
At this stage the structure might be recognizable as the symbol of whatever it will eventually picture, but the next major step is important: The wireframe has to be given a surface.
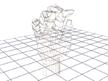
This illustration shows the wireframe of a hand made from relatively few polygons -- 862 total.
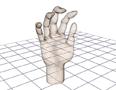
The outline of the wireframe can be made to look more natural and rounded, but many more polygons -- 3,444 -- are required.
Surface Textures
When we meet a surface in the real world, we can get information about it in two key ways. We can look at it, sometimes from several angles, and we can touch it to see whether it's hard or soft. In a 3D graphic image, however, we can only look at the surface to get all the information possible. All that information breaks down into three areas:
Color: What color is it? Is it the same color all over?
Texture: Does it appear to be smooth, or does it have lines, bumps, craters or some other irregularity on the surface?
Reflectance: How much light does it reflect? Are reflections of other items in the surface sharp or fuzzy?
One way to make an image look "real" is to have a wide variety of these three features across the different parts of the image. Look around you now: Your computer keyboard has a different color/texture/reflectance than your desktop, which has a different color/texture/reflectance than your arm. For realistic color, it’s important for the computer to be able to choose from millions of different colors for the pixels making up an image. Variety in texture comes both from mathematical models for surfaces ranging from frog skin to Jell-o gelatin to stored “texture maps” that are applied to surfaces. We also associate qualities that we can't see -- soft, hard, warm, cold -- with particular combinations of color, texture and reflectance. If one of them is wrong, the illusion of reality is shattered.
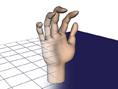
Adding a surface to the wireframe begins to change the image from something obviously mathematical to a picture we might recognize as a hand.
We'll take a look at lighting and perspective in the next section.
Lighting and Perspective
When you walk into a room, you turn on a light. You probably don't spend a lot of time thinking about the way the light comes from the bulb or tube and spreads around the room. But the people making 3D graphics have to think about it, because all the surfaces surrounding the wireframes have to be lit from somewhere. One technique, called ray-tracing, plots the path that imaginary light rays take as they leave the bulb, bounce off of mirrors, walls and other reflecting surfaces, and finally land on items at different intensities from varying angles. It's complicated enough when you think about the rays from a single light bulb, but most rooms have multiple light sources -- several lamps, ceiling fixtures, windows, candles and so on.
Lighting plays a key role in two effects that give the appearance of weight and solidity to objects: shading and shadows. The first, shading, takes place when the light shining on an object is stronger on one side than on the other. This shading is what makes a ball look round, high cheekbones seem striking and the folds in a blanket appear deep and soft. These differences in light intensity work with shape to reinforce the illusion that an object has depth as well as height and width. The illusion of weight comes from the second effect -- shadows.
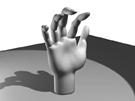
Lighting in an image not only adds depth to the object through shading, it "anchors" objects to the ground with shadows.
Solid bodies cast shadows when a light shines on them. You can see this when you observe the shadow that a sundial or a tree casts onto a sidewalk. And because we’re used to seeing real objects and people cast shadows, seeing the shadows in a 3D image reinforces the illusion that we’re looking through a window into the real world, rather than at a screen of mathematically generated shapes.
Perspective
Perspective is one of those words that sounds technical but that actually describes a simple effect everyone has seen. If you stand on the side of a long, straight road and look into the distance, it appears as if the two sides of the road come together in a point at the horizon. Also, if trees are standing next to the road, the trees farther away will look smaller than the trees close to you. As a matter of fact, the trees will look like they are converging on the point formed by the side of the road. When all of the objects in a scene look like they will eventually converge at a single point in the distance, that's perspective. There are variations, but most 3D graphics use the "single point perspective" just described.
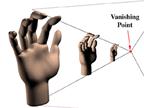
In the illustration, the hands are separate, but most scenes feature some items in front of, and partially blocking the view of, other items. For these scenes the software not only must calculate the relative sizes of the items but also must know which item is in front and how much of the other items it hides. The most common technique for calculating these factors is the Z-Buffer. The Z-buffer gets its name from the common label for the axis, or imaginary line, going from the screen back through the scene to the horizon. (There are two other common axes to consider: the x-axis, which measures the scene from side to side, and the y-axis, which measures the scene from top to bottom.)
Другие рефераты на тему «Иностранные языки и языкознание»:
Поиск рефератов
Последние рефераты раздела
- Важнейшие требования к композиции документа
- Гармония речи и основные законы современной риторики
- Выразительность речи и ее условия
- Времена группы Simple
- Версия унификации и усовершенствования азерлийских национальных фамилий в Азербайджане
- Грамматика английского языка в примерах и упражнениях
- Грамматические правила русского языка